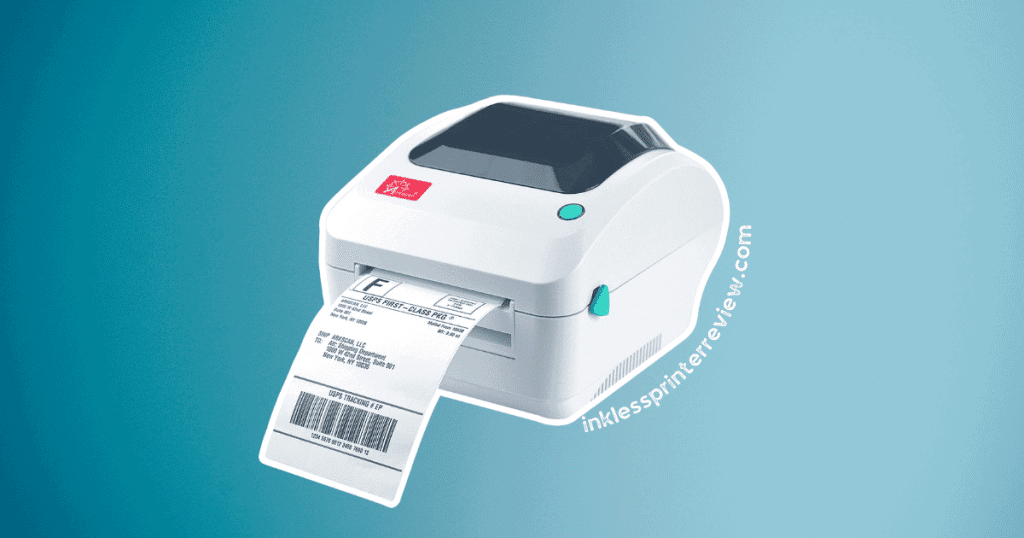
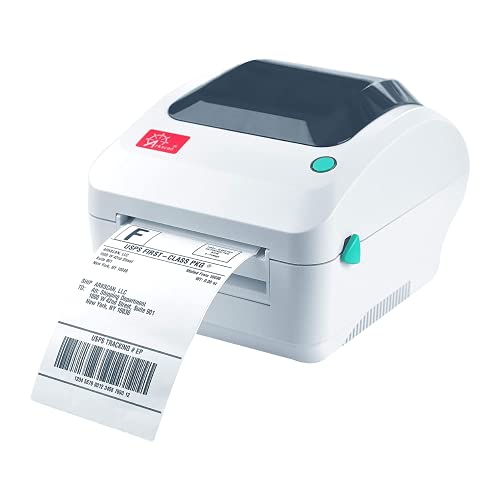
Are you tired of struggling with your shipping label printer? Well, look no further!
In this article, we will guide you through the step-by-step process of setting up your Arkscan thermal shipping label printer. From loading the label roll to troubleshooting any issues, we’ve got you covered.
With our easy-to-follow instructions and helpful tips, you’ll have your printer up and running in no time. Say bye to frustration and hello to effortless printing!


Unboxing and assembly
To assemble the Arkscan printer, follow these steps:
- Position the printer with the mouth facing you.
- Open it by pulling the green triangles towards you and up.
- Remove the rod from the middle of the printer.
- Place the rod through the shipping label roll and put the shield back on.
- Insert the label roll back into the printer.
The unboxing and assembly process is straightforward and easy to follow. By carefully following steps, you can quickly set up your Arkscan printer for use.
Once you have completed assembling your printer, it’s time to move on to power and connectivity. Follow these steps:
- Connect the power cable to your printer and turn it on.
- Press the feed button to dispense a label and check if everything is working correctly.
By observing indicators such as blue lights indicating readiness or red lights indicating an issue, you can troubleshoot any problems that may arise during setup.
After confirming that your printer is ready for use, you need to download and install drivers. Follow these steps:
- Visit arcscan.com to find their product page for 2054A thermal shipping label printers.
- Download their native driver installer to enable proper functionality.
With the installation complete, proceed to set up your printer on your computer by connecting it via a USB cable. Follow these steps:
- Open Printers and Scanners settings in your system’s control panel or settings menu.
Following these instructions will ensure a smooth setup process for your Arkscan printer without any hassle or confusion. Now let’s move on to power and connectivity for further configuration options.
Power and connectivity
Connect the power cable and turn on the printer to check its readiness.
Once you have done this, there are a few steps you can take to ensure that your Arkscan printer is properly set up and connected.
Check for Power
Make sure the printer is receiving power by connecting the power cable and turning it on. Look for a blue light, which indicates that the printer is ready to use. If you see a red light instead, there may be an issue with the printer that needs to be addressed.
Test Label Dispensing
Press feed button on the printer to dispense a label. This will help verify that everything is functioning correctly.
Use Auto-Detect Feature
To make sure your labels are printed accurately, utilize the label size auto-detecting feature. Hold down the green button while turning on the printer. The printer will use a page or two for measuring purposes, ensuring optimal printing results.
By following these steps, you can ensure that your Arkscan printer is powered on correctly and ready to use.
Now that your printer is powered up and checked for readiness, it’s time to move on to driver installation.
Driver installation
Once you have downloaded and installed the printer drivers, you can proceed with setting up the printer on your computer. The driver installation is a crucial step in the Arkscan printer setup process. By installing the correct drivers for your specific printer model, you ensure that your computer can communicate effectively with the printer and utilize all its features.
Arkscan offers a range of connectivity options for their printers, making them a smart choice for various setups. Whether you prefer USB, Ethernet, or wireless connection, Arkscan has got you covered. Additionally, they also provide leasing options for those who require flexibility in their printing solutions.
To begin the driver setup, visit arcscan.com and navigate to the product page for your 2054A thermal shipping label printer. From there, go to the Downloads tab and download the native driver installer. Once downloaded, execute file and follow the prompts to accept license agreement, and select a download location.
After unpacking the drivers, run the driver wizard to complete the installation process. Make sure to finish all necessary steps and allow any required application changes to be made on your computer.
Now that you have successfully installed the drivers for your Arkscan printer model, it’s time to set up the printer on your computer. Connect your printer via USB and open the Printers and Scanners settings in your system. Select your 2054A printer from the list and press Manage.
Next, ensure that you have selected the correct port under the Ports tab within the Printer Properties menu. Adjust any necessary settings in the General, Page Setup, and Graphics tabs according to your preferences.
With everything properly set up on your computer after installing drivers for Arkscan printers, you are now ready to move on to loading paper into your Arkscan thermal shipping label printer.
- Editors Choice

- Best Seller
- Amazon Choice

Paper loading process
When loading paper into your thermal shipping label printer, make sure to follow these steps.
- Position the printer with the mouth facing you.
- Open the label printer by pulling the green triangles towards you and up.
- Remove the rod from the middle of the printer.
- Place the rod through the shipping label roll and put the shield back on.
- Insert the label roll back into the printer, ensuring correct orientation.
Checking printer readiness and troubleshooting
- Connect the power cable and turn on the printer.
- Press the feed button to dispense a label.
- Blue light indicates readiness and a red light indicates an issue.
- Use the label size auto-detecting feature by holding the green button while turning on the printer. The printer uses a page or two for measuring purposes.
Downloading and installing the printer drivers
- Go to arcscan.com and navigate to their product page for the 2054A thermal shipping label printer.
- Click on the Downloads tab and download their native driver installer.
- Execute the file, accept the license agreement, select a download location, and run the driver wizard after unpacking drivers.
- Finish the installation, and allow application changes to the computer.
Setting up your printer on your computer
- Connect your printer to computer via a USB connection.
- Open Printers & Scanners settings in system settings.
- Select 2054A printer & press Manage.
- Ensure correct port is selected under the Ports tab.
- Adjust settings in the General, Page Setup & Graphics tabs.
Testing Your Printer
- Print a test page from printer properties menu.
- Download sample shipping labels from the Arkscan website.
- Ensure the correct print size & paper size are selected.
- Print sample labels & check if they print correctly.
Printer settings adjustment
To adjust your printer settings, simply navigate to the Printers and Scanners settings in your system. Once there, select the Arkscan A model from the list of printers and click on the ‘Manage’ button. This will allow you to access various options for customizing your printing experience.
Under the ‘General’ tab, you can choose default paper size and orientation for your labels. You can also set the print quality and adjust other general settings that suit your needs.
In the ‘Page Setup’ tab, you have the ability to configure specific label sizes and layouts. This is especially useful if you frequently use different types of labels or need precise measurements for shipping purposes.
The ‘Graphics’ tab offers additional customization options, such as adjusting brightness, contrast, and saturation levels. These settings can help enhance the clarity and appearance of your printed labels.
When adjusting these printer settings, it’s important to ensure that you have installed the necessary printer drivers. To do this, visit arcscan.com and go to the product page for the 2054A thermal shipping label printer. From there, download and install the native driver installer provided.
Once you’ve adjusted your printer settings accordingly, you’re ready to move on to ink or toner installation without any further steps needed.
Transition into a subsequent section about ‘ink or toner installation’:
Now that your printer settings are properly adjusted for optimal label printing performance let’s move on to installing ink or toner cartridges in your Arkscan A model printer.
Ink or toner installation
Now you can easily install the ink or toner cartridges in your printer by following these simple steps for Arkscan printer setup.
First, locate the ink or toner compartments on your printer. They are usually located on the front or top of the printer. Open the compartment by pulling it towards you or lifting a cover.
Next, take out the new ink or toner cartridge from its packaging and remove protective seals or covers. Make sure to shake the cartridge gently to distribute the ink evenly.
Then, insert the cartridge into its corresponding slot in the printer. It should fit snugly and click into place. If there are multiple cartridges, repeat this process for each one.
After all, cartridges are installed, close the compartment securely. Ensure that it is properly aligned and latched to prevent any leaks or malfunctions.
Finally, turn on your printer and allow it some time to initialize and recognize the new cartridges. Your printer may prompt you with an alignment test page that needs to be printed and scanned.
With these easy steps, you have successfully installed the ink or toner cartridges in your Arkscan printer during setup. Now let’s move on to configuring your network settings without missing a beat.
- Editors Choice

- Best Seller

- Amazon Choice

Network configuration
Once the ink or toner cartridges are installed, the next step is configuring your network settings for easy printing. To set up your Arkscan printer for network configuration, follow these steps:
Connect your Arkscan printer to your Wi-Fi network
- Access the printer’s control panel and navigate to the Network settings.
- Select ‘Wi-Fi Setup’ and choose your network from the available options.
- Enter Wi-Fi password when prompted and wait for the printer to connect.
Configure IP address settings
- Access the Network settings on the printer’s control panel.
- Choose ‘TCP/IP Settings’ and select ‘Automatic (DHCP)’ or enter a static IP address if required by your network.
Adjust print quality and speed preferences
- Use Arkscan Alan software or other compatible software to access advanced print settings.
- Customize print resolutions according to your specific needs.
- Adjust print speeds to optimize efficiency without compromising quality.
By configuring your Arkscan printer’s network settings, you can ensure seamless connectivity within your office environment. These sophisticated office models offer various design print features, allowing you to produce professional-quality prints. With adjustable print resolutions and speeds, you have control over how your printer prints documents.
Transitioning into mobile printing setup, once you have completed the network configuration process, you can easily enable mobile printing capabilities for even greater convenience and flexibility in accessing and sending print jobs from smartphones or tablets.
Mobile printing setup
After configuring your network settings, it’s easy to enable mobile printing capabilities on your Arkscan printer. To set up mobile printing, follow these steps:
- Download the Arkscan Mobile Print app from the App Store or Google Play Store.
- Open the app and tap on ‘Add Printer’ to search for available printers.
- Select your Arkscan printer from the list of discovered devices.
- Follow the prompts to complete the setup process, including entering any required network information.
Once you have successfully set up mobile printing on your Arkscan printer, you can conveniently print wirelessly from your smartphone or tablet. Whether you need to print shipping labels, invoices, or other documents, mobile printing offers flexibility and convenience.
To troubleshoot common issues with mobile printing on your Arkscan printer, there are a few things you can try:
- Ensure that both your printer and mobile device are connected to the same Wi-Fi network.
- Make sure that you have installed the latest firmware updates for both your printer and mobile device.
- Restart both your printer and mobile device to refresh their connections.
- Check that the paper is loaded correctly in the printer tray.
- If you’re still experiencing issues, consult the user manual or contact Arkscan support for further assistance.
By following steps and troubleshooting tips, you can easily set up and enjoy mobile printing capabilities on your Arkscan printer without any hassle or complications.
Next, we will discuss some common issues that users may encounter when setting up their Arkscan printers.
Troubleshooting common issues
To troubleshoot common issues with your mobile printing, try ensuring that both your printer and mobile device are connected to same Wi-Fi network. This is important because if they are not on the same network, your mobile device will not be able to communicate with the printer. Additionally, make sure that both devices have a stable internet connection.
If you are still experiencing issues after checking the Wi-Fi connection, try restarting both your printer and mobile device. Sometimes restart can resolve any temporary glitches or connectivity problems.
Another troubleshooting step you can take is to update the firmware or software of your printer and mobile device. Manufacturers often release updates fix bugs and improve performance. Check for any available updates and install them if necessary.
If none of steps resolve the issue, it may be helpful to consult user manual or customer support for further assistance. They will provide specific troubleshooting steps based on your printer model and mobile device.
By following these troubleshooting tips, you should be able to resolve common issues with your Arkscan printer setup. However, it’s important to note that regular maintenance is also key in preventing future problems. Proper cleaning and care of your printer can help prolong its lifespan and ensure performance.
In the next section, we will provide some printer maintenance tips to help you keep your Arkscan printer running smoothly.
- Editors Choice

- Best Seller

- Amazon Choice

Printer maintenance tips
Now you’ve learned how to troubleshoot common issues with your Arkscan printer let’s move on to some important maintenance tips.
Taking care of your printer will ensure its longevity and optimal performance.
First and foremost, it’s essential to use compatible label rolls for your Arkscan printer. Using the wrong type of label could damage printer or result in poor print quality. Make sure to purchase high-quality thermal labels specifically designed for your professional label printer.
Regularly clean the printhead and roller of your printer using a lint-free cloth or cleaning pen. This will prevent buildup of dirt or debris that could affect the print quality.
Another important aspect of maintenance is properly storing your barcode labels. Keep them in cool, dry place away from direct sunlight or extreme temperatures. This will help preserve their adhesive properties and ensure accurate scanning.
When loading new label rolls, always follow the instructions provided by Arkscan. Improper installation can lead to printing errors or jams. Additionally, avoid overloading the label holder, as this can cause feeding problems.
Lastly, it’s recommended to periodically calibrate your printer for optimal performance. Refer to user manual for specific instructions on how to do this.
Frequently Asked Questions
How Do I Calibrate the Label Size on the Arkscan Printer?
To calibrate the label size on your Arkscan printer, follow these steps.
First, turn on the printer and hold down the green button while powering it on to activate the label size auto-detecting feature.
The printer will use a page or two for measuring purposes.
Once calibrated, you can adjust settings in the Printers and Scanners settings on your computer to ensure accurate printing.
For more detailed instructions, refer to the Arkscan Printer Setup guide.
Can I Use the Arkscan Printer With a Mac Computer?
Yes, you can use the Arkscan printer with a Mac computer. To set it up, follow these steps:
- Connect the printer to computer using USB cable.
- Open the Printers and Scanners settings in your system.
- Select the 2054A printer and press Manage.
- Make sure the correct port is selected under the Ports tab.
- Adjust settings in the General, Page Setup, and Graphics tabs as needed.
- Test the printer by printing test page or a sample shipping label from the Arkscan website.
Is It Possible to Print Multiple Labels at Once With the Arkscan Printer?
Yes, it’s possible to print multiple labels at once with the Arkscan printer. This feature allows you to save time and increase efficiency when printing shipping labels or other documents.
What Is the Maximum Label Size That the Arkscan Printer Can Accommodate?
The maximum label size that the Arkscan printer can accommodate depends on the specific model. To find this information, refer to the product specifications or documentation provided by Arkscan.
How Do I Clean the Print Head on the Arkscan Printer?
To clean the print head on your Arkscan printer, gently open the printer cover and locate the print head assembly.
Use soft, lint-free cloth slightly dampened with water to carefully wipe the print head in a sweeping motion. Be sure to remove dirt or debris that may have accumulated. Avoid using excessive force or harsh cleaning agents, as this can damage the print head.
Once cleaned, close the printer cover, and you’re good to go!


Final Thoughts
Congratulations! You’ve successfully completed the setup process for your Arkscan thermal shipping label printer.
By following the step-by-step instructions provided, you’ve learned how to:
- Load the label roll
- Check printer readiness
- Download and install drivers
- Connect the printer to your computer
- Adjust settings
- Troubleshoot any issues that may arise
Now you’re ready to start printing shipping labels with ease and efficiency.
Remember to regularly maintain your printer to ensure optimal performance.
Happy printing!